
Sometimes you want to test your web project from a physical device. Simply shrinking the screen size on a desktop browser can certainly help with a large portion of the process and ensure your system is responsive, but it still lacks the feel of a touch interface.
Luckily, it's quite easy to set this up. The instructions are for macOS + iOS but the tools used are open source so the concept can be transferred to any development setup. For this example, we will use myproject.test as the domain name for your project. Replace this with your own domain name(s).
Install a DNS server
Any DNS server will do, but I recommend dnsmasq. It's lightweight and easy to configure. You can install it with Homebrew:
brew install dnsmasqDetermine your host machine IP
Since your development machine will be the host, you need to know its IP address. You can find this by running ifconfig and looking for the IP address of the network interface you are using. It will likely be en0 or en1. A shortcut for this is ipconfig getifaddr en0 if you know the interface name.
Let's use 192.168.1.100 as the example for the rest of this article. Replace this value with your own IP.
We will also use 1.1.1.1 as the primary upstream DNS where we get all real internet resolutions. You can use any public DNS service here, but Cloudflare is a good choice for privacy and speed.
Configure dnsmasq
The default location for dnsmasq via homebrew is ${brew --prefix}/etc/dnsmasq.conf. There are a lot of options here, but we will focus on the basics then you can customize as you desire.
# Ignore /etc/resolv.conf and use this config only.
no-resolv

# Use Cloudflare DNS at the fallback. You can use any other public DNS service here.
server=1.1.1.1

# Listen on the network IP address so your mobile device can access it.
# dnsmasq will automatically listen to the loopback address so 127.0.0.1 is not needed here.
listen-address=192.168.1.100

# Your custom domain(s) to resolve. All other requests will be forwarded to the upstream DNS.
address=/myproject.test/192.168.1.100
address=/api.myproject.test/192.168.1.100
Start dnsmasq
Since the DNS default port (53) is less than 1024 you will need to use sudo to run this properly as root. Running this without sudo will result in an error since the process will not have permission to bind to the port correctly.
sudo brew services start dnsmasqOptional: Configure your host machine
Although its not required, it might be a good idea to use the same DNS server on your desktop and your mobile device for consistency.
You can access this via macOS system settings UI:
System Settings -> Network -> Ethernet / -> Details -> DNS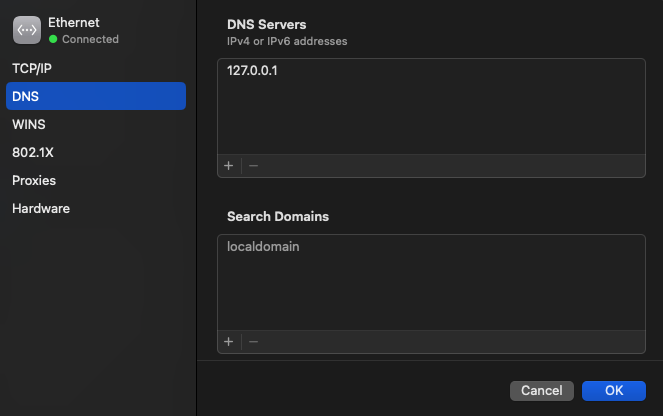
or via the command line:
# Set your ethernet connection to use local DNS server
sudo networksetup -setdnsservers Ethernet 127.0.0.1

# You can set multiple addresses as a fallback.
# Note, the fallback will not work with your custom overrides but will kee yoru itnernet working if your DNS server is down.
sudo networksetup -setdnsservers Ethernet 127.0.0.1 1.1.1.1
Optional: Verify host setup
Now that you have the server running and by running:
dig @127.0.0.1 myproject.testIf everything is working correctly you should see your development machine IP address in the response.
;; ANSWER SECTION:
myproject.test.		10  IN A 192.168.1.100
Configure your mobile device
Now it's time to update your iPhone (or other device) DNS settings to point to your host machine. You do this by going into your network settings, opening the details for your network then scrolling to the bottom to "Configure DNS". Change this to "Manual" and add your host machine IP address as the primary DNS server. You can also add your fallback IP here as well incase your host machine is unreachable.
Verify your mobile device setup
You should now be able to open Safari on your mobile device and navigate to http://myproject.test and see your development environment. If you see a timeout or other error, double check your DNS settings on your mobile device and ensure the dnsmasq service is running on your host machine.